|
Supplementary code for the Build a Large Language Model From Scratch book by Sebastian Raschka Code repository: https://github.com/rasbt/LLMs-from-scratch |

|
Chapter 7 Exercise solutions#
Exercise 7.1: Changing prompt styles#
Suppose we have the following data entry:
{
  "instruction": "Identify the correct spelling of the following word.",
  "input": "Ocassion",
  "output": "The correct spelling is 'Occasion.'"
}
In the main chapter, we formatted it according to the Alpaca-style prompt template:
Below is an instruction that describes a task. Write a response that appropriately completes the request.

### Instruction:
Identify the correct spelling of the following word.

### Input:
Occassion

### Response:
The correct spelling is 'Occasion.'
In this exercise, we now use the Phi-3 prompt template instead, which formats the data entry as follows:
<user>
Identify the correct spelling of the following word: 'Occasion'

<assistant>
The correct spelling is 'Occasion'.
Note that this prompt template is substantially shorter, which reduces the runtime and hardware requirements for finetuning the LLM and generating text since the input prompts are shorter.
To make this change, we update the format_input function as follows:
def format_input(entry):
    instruction_text = (
        f"<|user|>\n{entry['instruction']}"
    )

    input_text = f"\n{entry['input']}" if entry["input"] else ""

    return instruction_text + input_text
Let’s make sure that it works as intended by applying it to two input samples, one with and one without content in the 'input' field:
sample_data = [
    {'instruction': 'Identify the correct spelling of the following word.', 'input': 'Ocassion', 'output': "The correct spelling is 'Occasion.'"},
    {'instruction': "What is an antonym of 'complicated'?", 'input': '', 'output': "An antonym of 'complicated' is 'simple'."}
]

print(format_input(sample_data[0]))
print()
print(format_input(sample_data[1]))
<|user|>
Identify the correct spelling of the following word.
Ocassion

<|user|>
What is an antonym of 'complicated'?
Next, we also update the InstructionDataset class to use the <|assistant|> prompt template for the response:
import tiktoken
from torch.utils.data import Dataset

class InstructionDataset(Dataset):
    def __init__(self, data, tokenizer):
        self.data = data

        # Pre-tokenize texts
        self.encoded_texts = []
        for entry in data:

            ###################################################################
            # NEW: Use `format_input_phi` and adjust the response text template
            instruction_plus_input = format_input(entry)
            response_text = f"\n<|assistant|>:\n{entry['output']}"
            ###################################################################
            full_text = instruction_plus_input + response_text
            self.encoded_texts.append(
                tokenizer.encode(full_text)
            )

    def __getitem__(self, index):
        return self.encoded_texts[index]

    def __len__(self):
        return len(self.data)


tokenizer = tiktoken.get_encoding("gpt2")
Lastly, we also have to update the way we extract the generated response when we collect the test set responses:
for i, entry in tqdm(enumerate(test_data), total=len(test_data)):

    input_text = format_input(entry)
    tokenizer=tokenizer

    token_ids = generate(
        model=model,
        idx=text_to_token_ids(input_text, tokenizer).to(device),
        max_new_tokens=256,
        context_size=BASE_CONFIG["context_length"],
        eos_id=50256
    )
    generated_text = token_ids_to_text(token_ids, tokenizer)

    # New: Adjust ###Response -> <|assistant|>
    response_text = generated_text[len(input_text):].replace("<|assistant|>:", "").strip()

    test_data[i]["model_response"] = response_text
For your convenience, the exercise solution is implemented in the exercise_experiments.py script, which you can run as follows:
python exercise_experiments.py --exercise_solution phi3_prompt
Output:
matplotlib version: 3.7.1
tiktoken version: 0.7.0
torch version: 2.3.0+cu121
tqdm version: 4.66.4
tensorflow version: 2.15.0
--------------------------------------------------
Training set length: 935
Validation set length: 55
Test set length: 110
--------------------------------------------------
Device: cuda
--------------------------------------------------
...
Loaded model: gpt2-medium (355M)
--------------------------------------------------
Initial losses
   Training loss: 3.71630220413208
   Validation loss: 3.6440994262695314
Ep 1 (Step 000000): Train loss 2.633, Val loss 2.622
...
Ep 2 (Step 000230): Train loss 0.424, Val loss 0.928
<|user|> Convert the active sentence to passive: 'The chef cooks the meal every day.' <|assistant|>: The meal is prepared every day by the chef....
Training completed in 1.50 minutes.
Plot saved as loss-plot-phi3-prompt.pdf
--------------------------------------------------
Generating responses
100% 110/110 [00:11<00:00,  9.27it/s]
Responses saved as instruction-data-with-response-phi3-prompt.json
Model saved as gpt2-medium355M-sft-phi3-prompt.pth
For comparison, you can run the original chapter 7 finetuning code via python exercise_experiments.py --exercise_solution baseline.
Note that on an Nvidia L4 GPU, the code above, using the Phi-3 prompt template, takes 1.5 min to run. In comparison, the Alpaca-style template takes 1.80 minutes to run. So, the Phi-3 template is approximately 17% faster since it results in shorter model inputs.
Let’s take a look at some of the responses to make sure they have been formatted correctly:
    {
        "instruction": "Rewrite the sentence using a simile.",
        "input": "The car is very fast.",
        "output": "The car is as fast as lightning.",
        "model_response": "The car is as fast as a cheetah."
    },
    {
        "instruction": "What type of cloud is typically associated with thunderstorms?",
        "input": "",
        "output": "The type of cloud typically associated with thunderstorms is cumulonimbus.",
        "model_response": "The type of cloud associated with thunderstorms is a cumulus cloud."
    },
    {
        "instruction": "Name the author of 'Pride and Prejudice'.",
        "input": "",
        "output": "Jane Austen.",
        "model_response": "The author of 'Pride and Prejudice' is Jane Austen."
    },
We can evaluate the performance using the Ollama Llama 3 method, which is for your convenience, also implemented in the python exercise_experiments.py script, which we can run as follows:
python ollama_evaluate.py --file_path instruction-data-with-response-phi3-prompt.json
Output:
Ollama running: True
Scoring entries: 100%|████████████████████████| 110/110 [01:08<00:00,  1.60it/s]
Number of scores: 110 of 110
Average score: 48.87
The score is close to 50, which is in the same ballpark as the score we previously achieved with the Alpaca-style prompts.
There is no inherent advantage or rationale why the Phi prompt-style should be better, but it can be more concise and efficient, except for the caveat mentioned in the Tip section below.
Tip: Considering special tokens#
Note that the Phi-3 prompt template contains special tokens such as
<|user|>and<|assistant|>, which can be suboptimal for the GPT-2 tokenizerWhile the GPT-2 tokenizer recognizes
<|endoftext|>as a special token (encoded into token ID 50256), it is inefficient at handling other special tokens, such as the aforementioned onesFor instance,
<|user|>is encoded into 5 individual token IDs (27, 91, 7220, 91, 29), which is very inefficientWe could add
<|user|>as a new special token intiktokenvia theallowed_specialargument, but please keep in mind that the GPT-2 vocabulary would not be able to handle it without additional modificationIf you are curious about how a tokenizer and LLM can be extended to handle special tokens, please see the extend-tiktoken.ipynb bonus materials (note that this is not required here but is just an interesting/bonus consideration for curious readers)
Furthermore, we can hypothesize that models that support these special tokens of a prompt template via their vocabulary may perform more efficiently and better overall
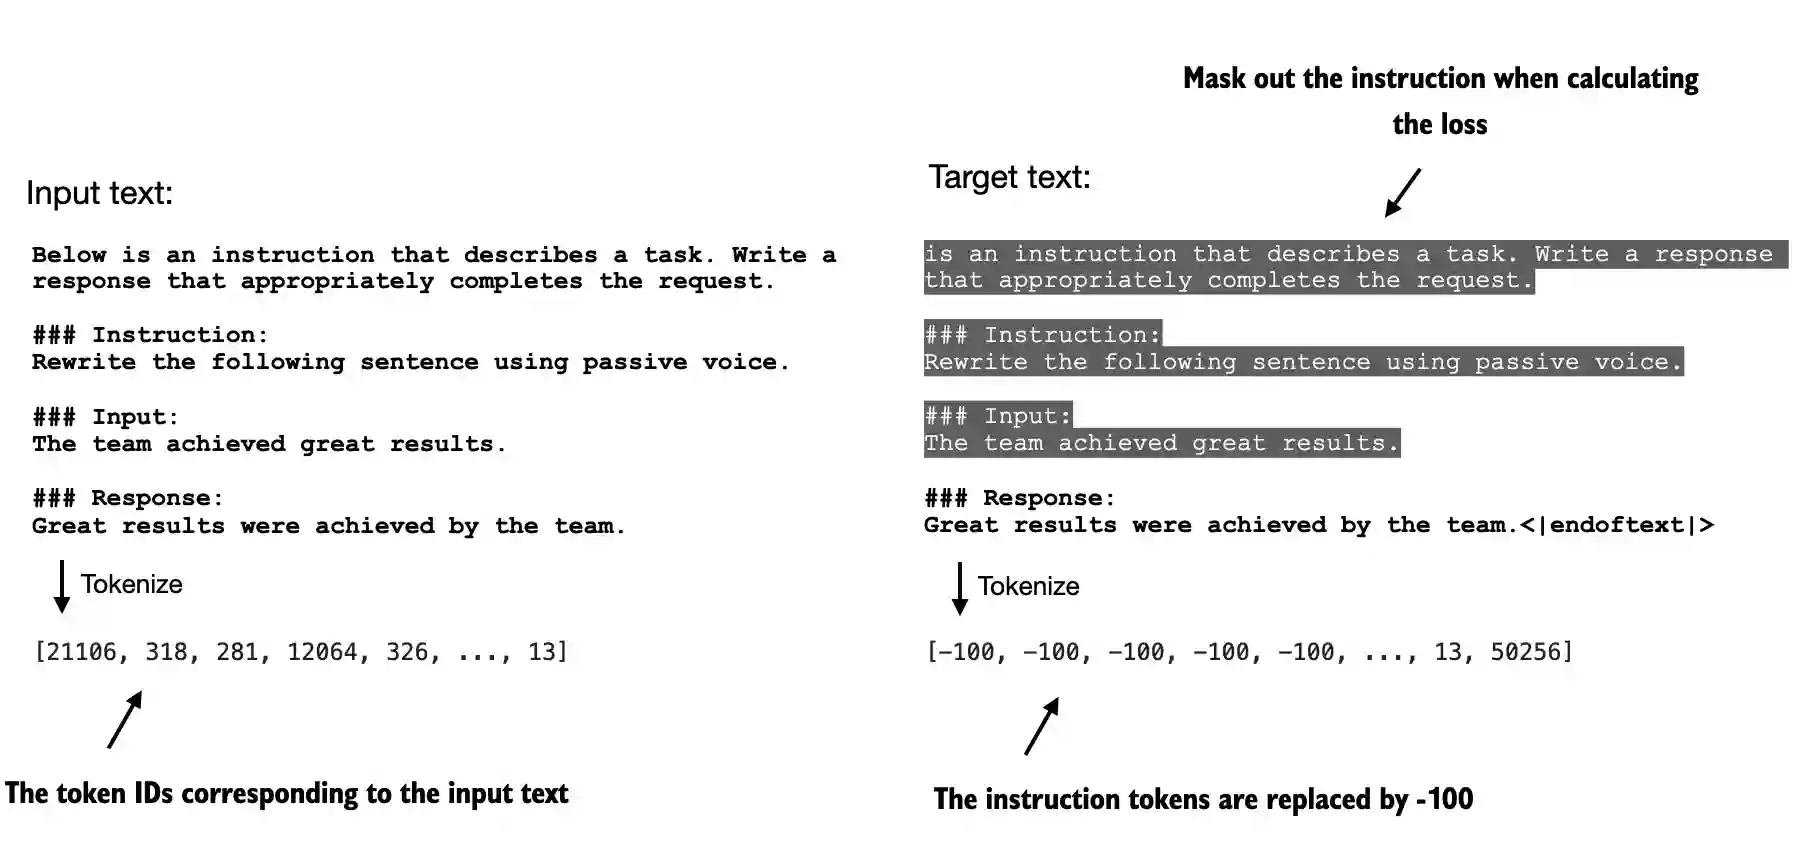
Exercise 7.2: Instruction and input masking#
To mask out the instructions as shown in the following figure, we need to make slight modifications to the InstructionDataset class and custom_collate_fn.
# This `format_input` function is copied from the original chapter 7 code

def format_input(entry):
    instruction_text = (
        f"Below is an instruction that describes a task. "
        f"Write a response that appropriately completes the request."
        f"\n\n### Instruction:\n{entry['instruction']}"
    )

    input_text = f"\n\n### Input:\n{entry['input']}" if entry["input"] else ""

    return instruction_text + input_text
We can modify the InstructionDataset class to collect the lengths of the instructions, which we will use in the collate function to locate the instruction content positions in the targets when we code the collate function, as follows:
import torch
from torch.utils.data import Dataset


class InstructionDataset(Dataset):
    def __init__(self, data, tokenizer):
        self.data = data

        ##########################################################################################
        # New: Separate list for instruction lengths
        self.instruction_lengths = []
        ##########################################################################################

        self.encoded_texts = []

        for entry in data:
            instruction_plus_input = format_input(entry)
            response_text = f"\n\n### Response:\n{entry['output']}"
            full_text = instruction_plus_input + response_text

            self.encoded_texts.append(
                tokenizer.encode(full_text)
            )

            ##########################################################################################
            # New: collect instruction lengths
            instruction_length = len(tokenizer.encode(instruction_plus_input))
            self.instruction_lengths.append(instruction_length)
            ##########################################################################################

    def __getitem__(self, index):
        # New: return both instruction lengths and texts separately
        return self.instruction_lengths[index], self.encoded_texts[index]

    def __len__(self):
        return len(self.data)
---------------------------------------------------------------------------
ModuleNotFoundError                       Traceback (most recent call last)
Cell In[4], line 1
----> 1 import torch
      2 from torch.utils.data import Dataset
      5 class InstructionDataset(Dataset):

ModuleNotFoundError: No module named 'torch'
import tiktoken

tokenizer = tiktoken.get_encoding("gpt2")
Next, we update the custom_collate_fn where each batch is now a tuple containing (instruction_length, item) instead of just item due to the changes in the InstructionDataset dataset. In addition, we now mask the corresponding instruction tokens in the target ID list.
def custom_collate_fn(
    batch,
    pad_token_id=50256,
    ignore_index=-100,
    allowed_max_length=None,
    device="cpu"
):
    # Find the longest sequence in the batch
    batch_max_length = max(len(item)+1 for instruction_length, item in batch)   # New: batch is now a tuple

    # Pad and prepare inputs and targets
    inputs_lst, targets_lst = [], []

    for instruction_length, item in batch:  # New: batch is now a tuple
        new_item = item.copy()
        # Add an <|endoftext|> token
        new_item += [pad_token_id]
        # Pad sequences to max_length
        padded = new_item + [pad_token_id] * (batch_max_length - len(new_item))
        inputs = torch.tensor(padded[:-1])  # Truncate the last token for inputs
        targets = torch.tensor(padded[1:])  # Shift +1 to the right for targets

        # Replace all but the first padding tokens in targets by ignore_index
        mask = targets == pad_token_id
        indices = torch.nonzero(mask).squeeze()
        if indices.numel() > 1:
            targets[indices[1:]] = ignore_index

        ##########################################################################################
        # New: Mask all input and instruction tokens in the targets
        targets[:instruction_length-1] = -100
        ##########################################################################################

        # Optionally truncate to maximum sequence length
        if allowed_max_length is not None:
            inputs = inputs[:allowed_max_length]
            targets = targets[:allowed_max_length]

        inputs_lst.append(inputs)
        targets_lst.append(targets)

    # Convert list of inputs and targets to tensors and transfer to target device
    inputs_tensor = torch.stack(inputs_lst).to(device)
    targets_tensor = torch.stack(targets_lst).to(device)

    return inputs_tensor, targets_tensor
Let’s try it out on some sample data below:
sample_data = [
    {'instruction': "What is an antonym of 'complicated'?", 'input': '', 'output': "An antonym of 'complicated' is 'simple'."},
    {'instruction': 'Sort the following list in alphabetical order.', 'input': 'Zebra, Elephant, Crocodile', 'output': 'Crocodile, Elephant, Zebra'},
    {'instruction': 'Arrange the given numbers in descending order.', 'input': '5, 12, 8, 3, 15', 'output': '15, 12, 8, 5, 3.'}
]
from torch.utils.data import DataLoader

train_dataset = InstructionDataset(sample_data, tokenizer)
train_loader = DataLoader(
    train_dataset,
    batch_size=len(sample_data),
    collate_fn=custom_collate_fn,
    num_workers=0
)
print("Train loader:")
for inputs, targets in train_loader:
    print(inputs.shape, targets.shape)
Train loader:
torch.Size([3, 64]) torch.Size([3, 64])
print("Inputs:\n", inputs[1])
print("\n\nTargets:\n", targets[1])
Inputs:
 tensor([21106,   318,   281, 12064,   326,  8477,   257,  4876,    13, 19430,
          257,  2882,   326, 20431, 32543,   262,  2581,    13,   198,   198,
        21017, 46486,    25,   198, 42758,   262,  1708,  1351,   287, 24830,
          605,  1502,    13,   198,   198, 21017, 23412,    25,   198,    57,
        37052,    11, 42651,    11,  9325, 19815,   576,   198,   198, 21017,
        18261,    25,   198,    34, 12204,   375,   576,    11, 42651,    11,
         1168, 37052, 50256, 50256])


Targets:
 tensor([ -100,  -100,  -100,  -100,  -100,  -100,  -100,  -100,  -100,  -100,
         -100,  -100,  -100,  -100,  -100,  -100,  -100,  -100,  -100,  -100,
         -100,  -100,  -100,  -100,  -100,  -100,  -100,  -100,  -100,  -100,
         -100,  -100,  -100,  -100,  -100,  -100,  -100,  -100,  -100,  -100,
         -100,  -100,  -100,  -100,  -100,  -100,   198,   198, 21017, 18261,
           25,   198,    34, 12204,   375,   576,    11, 42651,    11,  1168,
        37052, 50256,  -100,  -100])
As we can see based on the targets tensor, both the instruction and padding tokens are now masked using the -100 placeholder tokens.
Let’s decode the inputs just to make sure that they look correct:
print(tokenizer.decode(list(inputs[1])))
Below is an instruction that describes a task. Write a response that appropriately completes the request.

### Instruction:
Sort the following list in alphabetical order.

### Input:
Zebra, Elephant, Crocodile

### Response:
Crocodile, Elephant, Zebra<|endoftext|><|endoftext|>
Next, let’s decode the non-masked target token IDS:
non_masked_targets = targets[1][targets[1] != -100]

print(tokenizer.decode(list(non_masked_targets)))
### Response:
Crocodile, Elephant, Zebra<|endoftext|>
As shown above, the non-masked target tokens exclude the "Instruction" and "Input" fields, as intended. Now, we can run the modified code to see how well the LLM performs when finetuned using this masking strategy.
For your convenience, you can use the exercise_experiments.py code to run a comparison as follows:
python exercise_experiments.py --exercise_solution mask_instructions
Output:
matplotlib version: 3.7.1
tiktoken version: 0.7.0
torch version: 2.3.0+cu121
tqdm version: 4.66.4
tensorflow version: 2.15.0
--------------------------------------------------
Training set length: 935
Validation set length: 55
Test set length: 110
--------------------------------------------------
Device: cuda
--------------------------------------------------
...
Loaded model: gpt2-medium (355M)
--------------------------------------------------
Initial losses
   Training loss: 2.280539035797119
   Validation loss: 2.262560224533081
Ep 1 (Step 000000): Train loss 1.636, Val loss 1.620
...
Ep 2 (Step 000230): Train loss 0.143, Val loss 0.727
...
Training completed in 1.77 minutes.
Plot saved as loss-plot-mask-instructions.pdf
--------------------------------------------------
Generating responses
100% 110/110 [02:10<00:00,  1.19s/it]
Responses saved as instruction-data-with-response-mask-instructions.json
Model saved as gpt2-medium355M-sft-mask-instructions.pth
Next, let’s evaluate the performance of the resulting LLM:
python ollama_evaluate.py --file_path instruction-data-with-response-mask-instructions.json
Ollama running: True
Scoring entries: 100%|██████████████████████████████████████████████████████████████████████████████████████| 110/110 [01:23<00:00,  1.31it/s]
Number of scores: 110 of 110
Average score: 47.73
As we can see based on the scores, the instruction masking does perform slightly worse, which is consistent with the observation in the “Instruction Tuning With Loss Over Instructions” paper (https://arxiv.org/abs/2405.14394)
Exercise 7.3: Finetuning on the original Alpaca dataset#
To finetune the model on the original Stanford Alpaca dataset (tatsu-lab/stanford_alpaca), you just need to change the file URL from
url = "https://raw.githubusercontent.com/rasbt/LLMs-from-scratch/main/ch07/01_main-chapter-code/instruction-data.json"
to
url = "https://raw.githubusercontent.com/tatsu-lab/stanford_alpaca/main/alpaca_data.json"
Note that the dataset contains 52k entries (50x more than in chapter 7), and the entries are longer than the ones we worked with in chapter 7. Thus, it’s highly recommended that the training be run on a GPU.
If you encounter out-of-memory errors, consider reducing the batch size from 8 to 4, 2, or 1. In addition to lowering the batch size, you may also want to consider lowering the allowed_max_length from 1024 to 512 or 256.
For your convenience, you can use the exercise_experiments.py code to finetune the model on the 52k Alpaca dataset with a batch size of 4 and an allowed_max_length of 512 as follows:
python exercise_experiments.py --exercise_solution alpaca_52k
matplotlib version: 3.7.1
tiktoken version: 0.7.0
torch version: 2.3.0+cu121
tqdm version: 4.66.4
tensorflow version: 2.15.0
--------------------------------------------------
Training set length: 44201
Validation set length: 2601
Test set length: 5200
--------------------------------------------------
Device: cuda
--------------------------------------------------
...
Loaded model: gpt2-medium (355M)
--------------------------------------------------
Initial losses
   Training loss: 3.3681655883789063
   Validation loss: 3.4122894287109373
Ep 1 (Step 000000): Train loss 2.477, Val loss 2.750
...
Ep 2 (Step 022095): Train loss 0.761, Val loss 1.557
...
Training completed in 196.38 minutes.
Plot saved as loss-plot-alpaca52k.pdf
--------------------------------------------------
Generating responses
100% 5200/5200 [2:56:33<00:00,  2.04s/it]
Responses saved as instruction-data-with-response-alpaca52k.json
Model saved as gpt2-medium355M-sft-alpaca52k.pth
Below are a few examples from the Alpaca dataset, including the generated model responses:
[
    {
        "instruction": "Edit the following sentence to increase readability: \"He made a huge effort and was so successful.\"",
        "input": "",
        "output": "He exerted a tremendous effort, and thus enjoyed great success.",
        "model_response": "He put in an immense effort and was rewarded with success."
    },
    {
        "instruction": "Rewrite the following sentence to make it more concise: \"I was displeased with the result of the experiment that I conducted.\"",
        "input": "",
        "output": "I was unhappy with my experiment's outcome.",
        "model_response": "I was displeased with the results of the experiment."
    },
    {
        "instruction": "How can we build a more efficient GPT model?",
        "input": "",
        "output": "We can build a more efficient GPT model by optimizing the architecture of the model, using smaller model sizes and training with fewer parameters. We can also leverage techniques such as knowledge distillation, transfer learning, dynamic sparsity and hybrid computing to further improve the efficiency of the model.",
        "model_response": "Building a more efficient GPT model requires careful planning and optimization. First, it is important to identify the target language and the context in which the model is used. Then, it is important to select the appropriate model architecture, such as backpropagation, hyperparameters, and hyperparameters. Finally, it is important to select the appropriate model weights and optimizers, such as backpropagation, hyperparameters, and hyperparameters."
    },
]
Finally, we can evaluate the finetuned LLM using the ollama_evaluate.py utility function:
python ollama_evaluate.py --file_path instruction-data-with-response-alpaca52k.json
Scoring entries: 100%|████████████████████| 5200/5200 [1:07:52<00:00, 1.28it/s]
Number of scores: 5188 of 5200
Average score: 48.16
The score is slightly lower than the score we obtained on the dataset we used in this chapter. However, note that the Alpaca test set contains more diverse and partly more challenging instructions than the dataset we used in the main chapter.
Exercise 7.4: Parameter-efficient finetuning with LoRA#
To instruction finetune the model using LoRA, use the relevant classes and functions from appendix E:
from appendix_E import LoRALayer, LinearWithLoRA, replace_linear_with_lora
Next, add the following lines of code below the model loading code in section 7.5:
total_params = sum(p.numel() for p in model.parameters() if p.requires_grad)
print(f"Total trainable parameters before: {total_params:,}")

for param in model.parameters():
    param.requires_grad = False

total_params = sum(p.numel() for p in model.parameters() if p.requires_grad)
print(f"Total trainable parameters after: {total_params:,}")
replace_linear_with_lora(model, rank=16, alpha=16)

total_params = sum(p.numel() for p in model.parameters() if p.requires_grad)
print(f"Total trainable LoRA parameters: {total_params:,}")
model.to(device)
For your convenience, you can use the exercise_experiments.py code to finetune the model, using LoRA with rank 16 and alpa 16, as follows:
python exercise_experiments.py --exercise_solution lora
Output:
matplotlib version: 3.7.1
tiktoken version: 0.7.0
torch version: 2.3.0+cu121
tqdm version: 4.66.4
tensorflow version: 2.15.0
--------------------------------------------------
Training set length: 935
Validation set length: 55
Test set length: 110
--------------------------------------------------
Device: cuda
--------------------------------------------------
File already exists and is up-to-date: gpt2/355M/checkpoint
File already exists and is up-to-date: gpt2/355M/encoder.json
File already exists and is up-to-date: gpt2/355M/hparams.json
File already exists and is up-to-date: gpt2/355M/model.ckpt.data-00000-of-00001
File already exists and is up-to-date: gpt2/355M/model.ckpt.index
File already exists and is up-to-date: gpt2/355M/model.ckpt.meta
File already exists and is up-to-date: gpt2/355M/vocab.bpe
Loaded model: gpt2-medium (355M)
--------------------------------------------------
Total trainable parameters before: 406,286,336
Total trainable parameters after: 0
Total trainable LoRA parameters: 7,898,384
Initial losses
   Training loss: 3.7684114456176756
   Validation loss: 3.7619335651397705
Ep 1 (Step 000000): Train loss 2.509, Val loss 2.519
...
Ep 2 (Step 000230): Train loss 0.308, Val loss 0.652
...
--------------------------------------------------
Generating responses
100% 110/110 [01:52<00:00,  1.03s/it]
Responses saved as instruction-data-with-response-lora.json
Model saved as gpt2-medium355M-sft-lora.pth
For comparison, you can run the original chapter 7 finetuning code via python exercise_experiments.py --exercise_solution baseline.
Note that on an Nvidia L4 GPU, the code above, using LoRA, takes 1.30 min to run. In comparison, the baseline takes 1.80 minutes to run. So, LoRA is approximately 28% faster.
We can evaluate the performance using the Ollama Llama 3 method, which is for your convenience, also implemented in the python exercise_experiments.py script, which we can run as follows:
python ollama_evaluate.py --file_path instruction-data-with-response-lora.json
Output:
Ollama running: True
Scoring entries: 100%|████████████████████████| 110/110 [01:13<00:00,  1.50it/s]
Number of scores: 110 of 110
Average score: 50.23
The score is around 50, which is in the same ballpark as the original model.